
How to Implement a Simple UI for CrewAI applications
A Quick Tutorial of CrewAI + Streamlit

Welcome back to my continuous exploration of UI development for LLM-powered applications! In previous tutorials, we walked through very completely to the implementation of Panel-based UIs for AutoGen projects, discovering the benefits of visually monitoring multi-agent workflows and comparing decent structured output to the original terminal output. Today, we’ll continue our journey by implementing a simple visualized UI for LLM apps developed by another multi-agent framework — CrewAI. The main purpose is still unchanged, that help your app users have a better experience on playing your CrewAI applications/demos.
User Experience
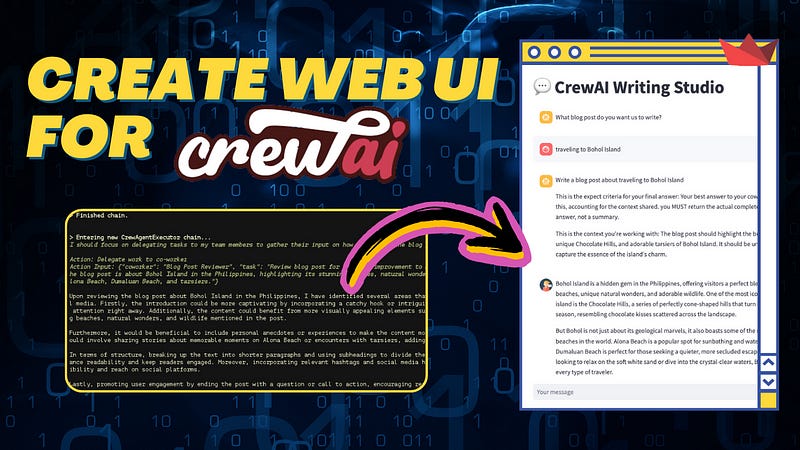
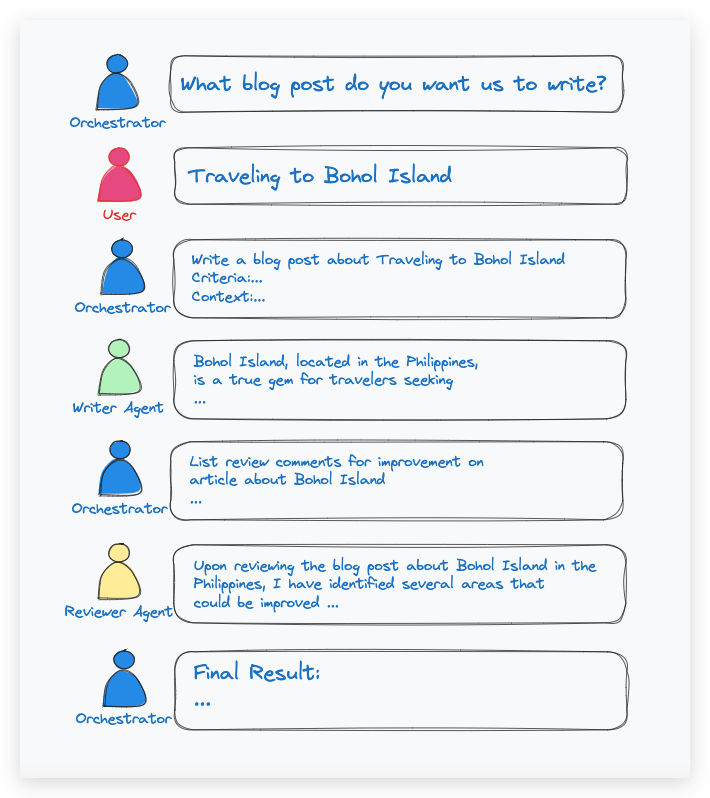
This demonstration will implement the blog writing assistant again (like our last demos) which allows the user to input the topic for a writing task, then the UI will display how the orchestrator agent prompts the writer agent and reviewer agent in sequence, and what content is generated by each agent.

In this application, we use the Streamlit framework for constructing the web app by using its chat widgets that mimic a studio with group chat among several LLM-powered agents in an automated way. The chat will be ended once the final answer is generated by the group. Here is the workflow.
Function Blocks
Before we dive into the system functions and its connections, let’s have a quick idea of what is Streamlit and what is CrewAI.
CrewAI
While multi-agent architectures are proving superior to solo agents in LLM applications, CrewAI stands out for its practicality and production-ready approach.

Unlike other multi-agent frameworks, CrewAI prioritizes efficiency and reliability by assigning clear roles and tasks to each AI agent, ensuring streamlined and deterministic interactions. Its key advantage lies in its seamless integration with LangChain, allowing developers to leverage existing tools and resources for building and managing agents. This makes CrewAI a compelling choice for those seeking a robust and user-friendly framework for building multi-agent LLM applications.
You will find more details about CrewAI in my previous article:

Streamlit
Streamlit simplifies the creation of web-based data apps with its Python framework and diverse range of widgets. Among its latest impressive offerings, the chat widget stands out, enabling developers to effortlessly integrate conversational interfaces into their applications. This allows users to interact with the LLM model in a natural and engaging way, providing prompts and receiving responses within a familiar chat format. Streamlit’s ease of use, coupled with its powerful chat functionality, makes it an ideal choice for developers looking to quickly build and deploy engaging LLM-powered applications with interactive conversational elements.

Block Diagram
Here is the block diagram for implementing the user experience by connecting the two frameworks.
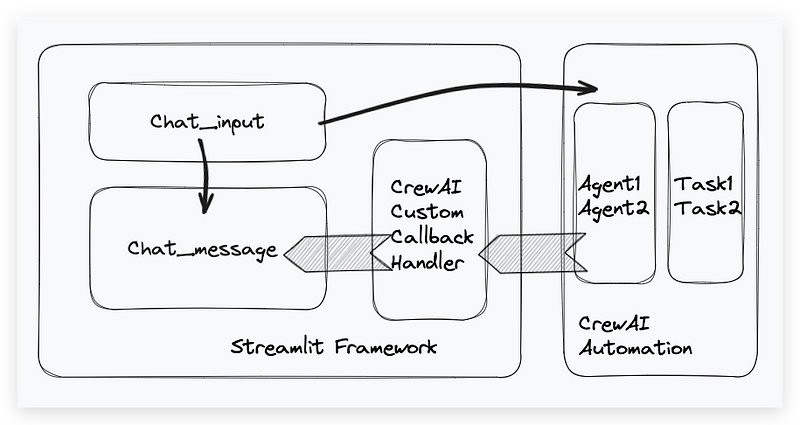
The key connection between Streamlit and CrewAI is the callback mechanism which can handle several specific events upon different stages of agent/task processing in the CrewAI automation. By leveraging this handler, we can insert chat_message() method to redirect the response output to the Streamlit interface.
Code Walkthrough
Let’s now turn our attention to the code.
In this project, we must install the latest CrewAI (≥ 0.22.5) package for the feature availability of the callback handler (BaseCallbackHandler). Meanwhile, the up-to-date Langchain package will also be installed as a dependency.
!pip install --upgrade crewai streamlitImport these packages.
import streamlit as st

from crewai import Crew, Process, Agent, Task
from langchain_core.callbacks import BaseCallbackHandler
from typing import TYPE_CHECKING, Any, Dict, Optional
from langchain_openai import ChatOpenAI
Firstly, we should initial the CrewAI with its key elements.
1. LLM Configuration
from langchain_openai import ChatOpenAI
llm = ChatOpenAI()
2. Agent Creation
writer = Agent(
    role='Blog Post Writer',
    backstory='''You are a blog post writer who is capable of writing a travel blog.
                      You generate one iteration of an article once at a time.
                      You never provide review comments.
                      You are open to reviewer's comments and willing to iterate its article based on these comments.
                      ''',
    goal="Write and iterate a decent blog post.",
    # tools=[]  # This can be optionally specified; defaults to an empty list
    llm=llm,
    callbacks=[MyCustomHandler("Writer")],
)
reviewer = Agent(
    role='Blog Post Reviewer',
    backstory='''You are a professional article reviewer and very helpful for improving articles.
                 You review articles and give change recommendations to make the article more aligned with user requests.
                 You will give review comments upon reading entire article, so you will not generate anything when the article is not completely delivered.
                  You never generate blogs by itself.''',
    goal="list builtins about what need to be improved of a specific blog post. Do not give comments on a summary or abstract of an article",
    # tools=[]  # Optionally specify tools; defaults to an empty list
    llm=llm,
    callbacks=[MyCustomHandler("Reviewer")],
)
Here we create two agents: a writer who will write blog posts and a reviewer who will give review comments for blog posts. To define the characteristics of an agent, you must provide a role, goal, and backstory for it. Each agent has a parameter callbacks which is linked to a custom callback handler.
