
How to Use Llama3.3 to Build a Local Agent Workflow
A Quick Tutorial for Creating Local Agents in CrewAI Framework Using Ollama


Meta has just released the Llama 3.3 70B model, which functionally does not follow its previous version, Llama 3.2. Llama 3.2 is a pack of edge models from 1B to 3B and vision models from 11B to 90B. However, the Llama 3.3 70B model is a single model that only supports text input and output, which looks more like an advanced version of Llama 3.1.
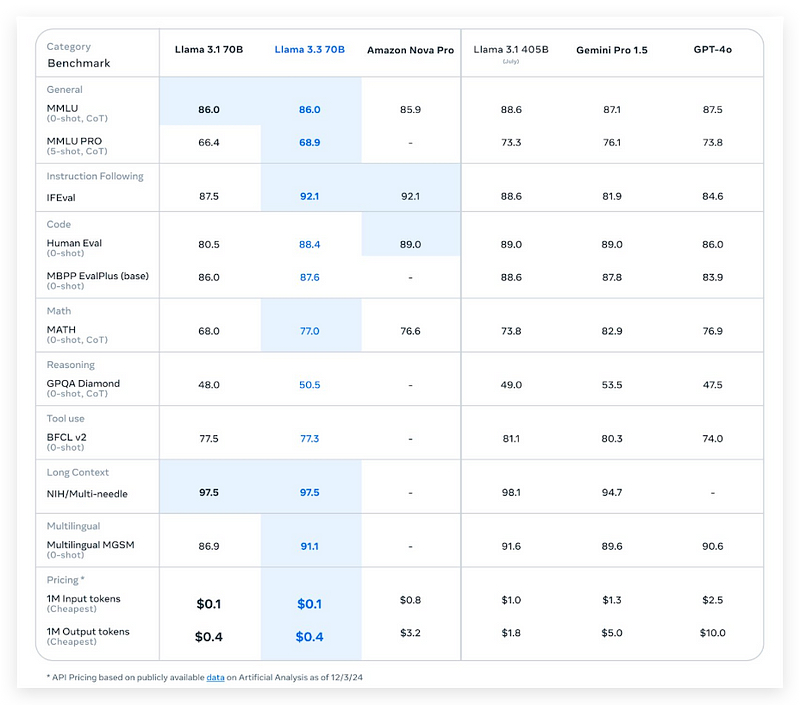
The team at Meta has achieved these improvements through innovative alignment processes and advanced online reinforcement learning techniques. The most impressive part is that Llama 3.3 matches the performance of the much larger Llama 3.1 405B model, and using the same prompt format, you can replace the model in your existing Llama 3.1 application with the llama3.3 to achieve the same generation quality but with much lower cost than before. With advanced optimization and quantization techniques and tools, you can now run the Llama 3.3 70B model more easily on your own GPU machine.
In this post, we’ll explore how you can leverage this powerful new model, which is now available through Ollama, to build your multi-agent workflow locally with the CrewAI framework. In that demo application, I will show you how to use the reliable tool calling feature of the llama3.3 to build practical agents to analyze tweet content. Let’s dive in!
First Try of Llama 3.3
The quickest way to try out llama3.3 is to use the online inference service through its OpenAI-compatible API. If you search for it, you can find many services right now on the Internet with different pricing plans. From the benchmark list of OpenRouter, I will choose NovitaAI as the inference API provider. Because it provides the bf16, one of the most efficient precisions in the list, and although the throughput is not so high, its price is almost the lowest, which is only 40 cents per 1M tokens for both input and output. The welcome 50 cents free credit is enough for you to have a first trial without any computing infrastructure setup.
Go to the Novita.ai website and sign up for an account. Afterwards, you can go to its playground, select the llama3.3 70b model, and ask for something immediately.

Then, find its API in the Python section, copy the code to your coding environment, which generates the response in the streaming demo, Change the API key to yours, change the model to 3.3, and run.

Setup a Cloud GPU
Now that we know how to use online llama 3.3 inference, let’s build a local agent workflow to complete complex jobs.
Before starting, we should ensure we have a local computing resource to run the 70B model. The 24GB GPU can normally run the inference as a minimum requirement, but if you want to run it at an acceptable speed, you should use the 48GB 4090 GPU or 80GB A100 GPU. If you don’t have such a GPU in your local machine, we can go back to Novita AI to rent a cloud GPU environment at an effective price.
You can go to the GPU instance page to create a new instance by selecting the GPU type. For this demo, I use the 2 4090 GPU with 48GB memory for only 0.6 USD per hour. You can start and stop the instance as you need to prevent unnecessary costs when you don’t use it, and also save your image to the docker.io hub for preserving the environment and data. Connect your new server with the SSH connect string, and now you have your own dedicated GPU to run model inference code.

Install the Ollama
Now, we need to install the Ollama, which is a lightweight tool for running Llama models locally in a very simple and effective way. Depending on your operating system, you can follow the instructions on the Ollama website to install it. After installing it, you can start the ollama server by running ollama serve in your terminal.

Okay, the server is running, but we don’t have this model's package on my local disk, so we need to pull the model's manifest from the model centre. Use this command: ollama pull llama3.3.
It will take some time, depending on the network status.
When the model is downloaded, we can move to the coding walkthrough.
Build the Local Agent Workflow
In this demo, we will create and make two agents work sequentially. The first agent will execute a custom function as a tool to scrape a tweet from a defined user. The second agent will use that tweet content to generate a structured summary of our pre-defined items.

First, we need to install Olama’s Python library and CrewAI framework, plus the Twikit library to scrape the tweets.
pip install crewai crewai-tools ollama twikit Let’s get our imports. At the top of our script, we have:
from crewai import Agent, Crew, Process, Task, LLM
from crewai.tools import BaseTool
from twikit import Client, Tweet
import asyncio
import os
from dotenv import load_dotenv
from pydantic import BaseModel
load_dotenv()
Besides the CrewAI libraries, we have the Twikit library, a smart library that scrapes tweet data from X.
You’ll want to create a .env file in your project and store your Twitter authentication info there. They are actually your username, email and password. There is no need for official X API authentication.
.env file:
AUTH_INFO_1=Your X username
AUTH_INFO_2=Your X email
PASSWORD=Your X password