How to Create APIs for AutoGen
A Quick Guide for Developing APIs for AutoGen under Flask Framework
Since we have gone through quite a lot of techniques on how to create visualization for multi-agent LLM applications, demonstrating these apps under AutoGen has become much more convenient and friendly. However, when a project steps from the demo phase to the production phase, using standalone and unified styling UI will be a weakness, there will be a huge demand for making more customized UI and complicated workflow with the capability to integrate to an existing platform that customers have already deployed.
In this tutorial, we will demonstrate building an API server of AutoGen as a backend using Flask, empowering customized front-end experiences and seamless integration with diverse systems.
Why an API Server?
Directly using Panel or Streamlit for AutoGen is excellent for prototyping or small projects, especially for a simple chatbot app, but building production-ready applications often demands:
Customized UI/UX: Tailoring the interface to specific branding and complex user experience requirements.
Integration: Connecting with existing webpages, databases, and workflows.
Scalability and Security: Managing user sessions, authentication, rate limitation, and handling multiple requests efficiently.
An API server decouples the front end from the implementation of multi-agent core logic powered by the AutoGen framework, which can provide the above advantages.
Architecture Overview
The architecture around a Flask API server that communicates with both a front-end application and the AutoGen engine:
1. Flask API Endpoints
If you don’t know much about the Flask — Flask is a Python web framework known for its lightweight and flexibility. It provides the various tools you need to build web applications quickly, without imposing strict structures or unnecessary dependencies.
In this project, we can use Flask for:
Receives user requests and data (e.g., messages, agent configurations).
Manages the AutoGen environment: Creates agents, handles message queues and orchestrates conversations.
Sends responses (e.g., chat status, agent outputs) back to the front end.
2. AutoGen Core
This is where the key enabler of multi-agent LLM interaction happens. The API endpoints interact with the AutoGen creation process, triggering conversations, receiving agent outputs, and managing the group chat workflow.
3. Front-End Application
This section will handle user interaction, send requests to the API server, and display responses. I will only demonstrate with a simple React example later. This section is open to you for various ideas, frameworks, and custom designs.
Code Walkthrough for the Server
We’ll be using Python with Flask for our API server. Here’s a breakdown code walkthrough of the key components.
0. Install the libraries
For the start, make sure you have installed AutoGen and Flask packages.
!pip install --upgrade pyautogen==0.2.31 flask==3.0.3 flask_cors==4.0.1Flask CORS stands for “Cross-Origin Requests” which is very essential for front-end communication from external network.
1. Initialization and Dependencies
import os
import time
import asyncio
import threading
import autogen
from flask import Flask, request, jsonify
from flask_cors import CORS
from autogen.agentchat.contrib.gpt_assistant_agent import GPTAssistantAgent
from autogen.agentchat import AssistantAgent, UserProxyAgent
import queue

app = Flask(__name__)
cors=CORS(app)

chat_status = "ended"

# Queues for single-user setup
print_queue = queue.Queue()
user_queue = queue.Queue()

# Replace with your actual OpenAI API key
os.environ["OPENAI_API_KEY"] = "Your_API_Key"
There are several key definitions we should prepare for the program.
Flask Setup: Initializes a Flask
app, and configures CORS for cross-origin requests.Queues:
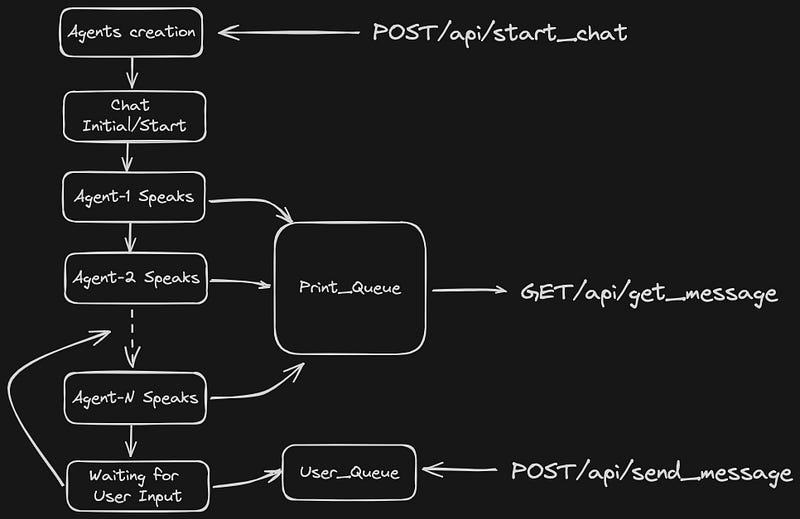
print_queuestores messages to be sent to the front end, whileuser_queuereceives user input. These queues are the key enablers for asynchronous communication.Chat Status:
chat_statushelps track the current state of the AutoGen conversation (e.g., “Chat ongoing”, “inputting”, “ended”).
2. API Endpoints
The Flask server should expose several API endpoints to manage conversations, so before any internal function implementation, we should design these endpoints in advance. By using Flask’s decorator app.route(…), it is very easy to define endpoint with relevant processing methods.
In this demonstration, we define the three most essential endpoints:
a) /api/start_chat (POST)
Responsible for initialing an AutoGen group chat by accepting agent configurations (in the request body request.json), task definitions (also in the request body request.json), queue initialization, etc… Then the handler will create a thread by using Python’s classic threading methods to handle the entire workflow run_chat (We will introduce it later.) of AutoGen for asynchronous operations. Using asynchronous operation, the response and further API requests will not be stuck by AutoGen processing, and the redirection of input and output is feasible as well.
@app.route('/api/start_chat', methods=['POST', 'OPTIONS'])
def start_chat():
    if request.method == 'OPTIONS':
        return jsonify({}), 200
    elif request.method == 'POST':
        global chat_status
        try:

            if chat_status == 'error':
                chat_status = 'ended'

            with print_queue.mutex:
                print_queue.queue.clear()
            with user_queue.mutex:
                user_queue.queue.clear()

            chat_status = 'Chat ongoing'

            thread = threading.Thread(
                target=run_chat,
                args=(request.json,)
            )
            thread.start()

            return jsonify({'status': chat_status})
        except Exception as e:
            return jsonify({'status': 'Error occurred', 'error': str(e)})
b) /api/send_message (POST)
Responsible for receiving user messages during an ongoing group chat.
@app.route('/api/send_message', methods=['POST'])
def send_message():
    user_input = request.json['message']
    user_queue.put(user_input)
    return jsonify({'status': 'Message Received'})
c) /api/get_message (GET)
Responsible for sending output messages from the group chat for the front-end fetching.
@app.route('/api/get_message', methods=['GET'])
def get_messages():
    global chat_status

    if not print_queue.empty():
        msg = print_queue.get()
        return jsonify({'message': msg, 'chat_status': chat_status}), 200
    else:
        return jsonify({'message': None, 'chat_status': chat_status}), 200
Here is the message flow that shows how the messages and requests interact.
3. Orchestrating the Conversation
So far, we have implemented the external interface of this API server, it’s time to create the internal process logic for the entire multi-agent generating workflow.
Keep reading with a 7-day free trial
Subscribe to Lab For AI to keep reading this post and get 7 days of free access to the full post archives.


