
How to Create an Interactive Web UI for CrewAI Applications (New Version Updated)
A Quick Update for the Implementation of CrewAI + Panel UI


Early this year, I wrote a tutorial about creating an interactive web UI for CrewAI applications, and in that tutorial, I implemented a simple web server to visualize the CrewAI agents and workflows and allow users to interact with them with messages. Since then, CrewAI has undergone many changes and improvements from version 0.28 to the latest version 0.80. Not only the API usages have been changed a lot, but also the entire architecture is different after this half of the year, so there are many developers in the tech community told me that the tutorial is outdated and they cannot update the CrewAI for new features but retain the existing UI designs in their projects.
In this tutorial, I will show you how to create the same web UI for the latest version of the CrewAI framework. You can see the innovative procedure for quickly building a multi-agent application with the new CrewAI framework, the way to customize the app by redirecting the agents' default output to the chat UI of Panel, a Python library for building custom web apps, and how to interact with each agent by sending messages on the UI.

What’s new in CrewAI since our last tutorial?
If you follow my last implementation of the CrewAI web app, you must now have a look at what significant changes have been made to the development of this framework. During May and June of 2024, CrewAI added various features like setting a manager for crews, customizable prompt and response templates, and integration with external tools, enhancing flexibility and user control over AI behavior. It also introduced new agent types to execute code directly, integration with third-party agents from various platforms, and a training CLI, significantly increasing the framework’s capabilities in handling complex, dynamic tasks. Those are all helpful features for multi-agent systems, and I will demonstrate how to leverage and expand them in future demonstrations.
To me, the most innovative step forward of CrewAI is its ability to create a complete application with a single command. With just crewai create crew my-app, you can instantly generate a fully functional multi-agent application with all the necessary modules, documentation, and configuration files. This includes pre-configured agent roles and tasks in YAML files, a crew orchestration module, and environment variable templates — everything needed to get started. The generated project structure follows best practices and includes features like task callbacks, process management, and agent coordination out of the box. This dramatically reduces the time and effort needed to build LLM multi-agent applications compared to starting from scratch with other frameworks that only provide APIs and examples.
Let’s warm up with an example of a CrewAI project.
Project Creation
Let’s walk through creating a simple CrewAI project that uses the default content.
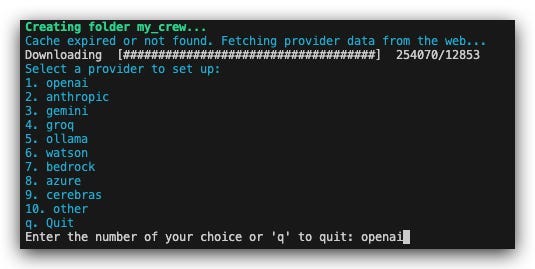
First, install the latest version of CrewAI (The current version is 0.80):
pip install crewai crewai-toolsThen, create a new CrewAI project using its CLI:
crewai create crew my_crewDuring creation, you will be asked to choose the language model and your API key for agents to use.
After a couple of seconds, you will see a message showing that your crew has been created successfully, and there will be a new directory called my_crew in your current working directory with the basic structure of your project.
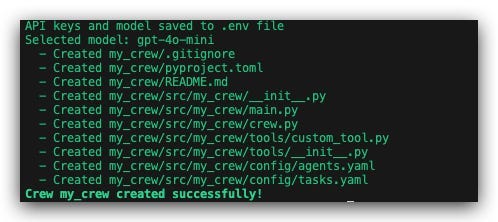
In the structure, you will find that the main.py and crew.py are located in the src/ directory and two YAML files are located in the src/config/ directory. The basic multi-agent logic is still implemented in the two Python files, but the system instructions for agents and tasks are now moved to the YAML files. This new structure separates the coding sections from the configuration sections, which allows more collaboration between the agent/prompt/tool designers (non-coding) and the multi-agent capabilities/workflow developers (coding). The default app demonstrates a simple multi-agent workflow that researches and reports on the latest AI developments for a given topic or subject. So let’s run the app by running the following command in the terminal:
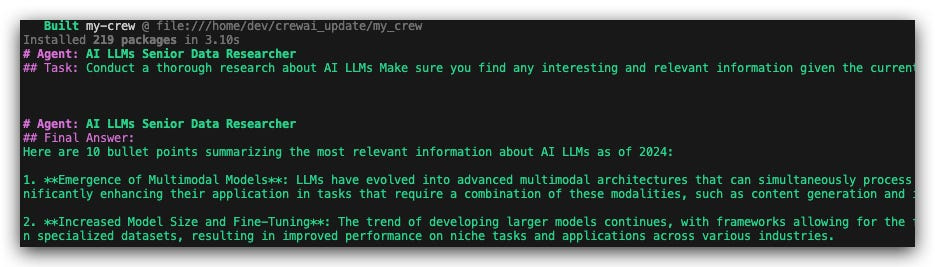
cd my_crew
crewai run
After automatically downloading the dependencies, the entire agent's workflow will be executed, and the output will be displayed in the terminal.
Understanding that now let’s move to the main topic of this tutorial to see how to wrap this command line application into the Panel Web UI based on this source code structure.
CrewAI + Panel integration
Following the design purpose, let’s redirect the task’s output and human input to the chat UI of Panel. Install the Panel first:
pip install panelcrew.py
Move to the crew.py file in the source directory and create the ChatInterface object from Panel’s widget library.
import panel as pn

chat_interface = pn.chat.ChatInterface()
Then, define the print_output() function to send the task’s output to the panel's chat UI.
from crewai.tasks.task_output import TaskOutput

def print_output(output: TaskOutput):

    message = output.raw
    chat_interface.send(message, user=output.agent, respond=False)
This function is designed to be called when a task is completed, so we need to register it as a callback function to each task definition.
Note that the human_input=True parameter is added to the reporting_task definition to allow the agent to interact with the user at the final step of the workflow.
@task
def research_task(self) -> Task:
    return Task(
        # ...existing parameters...
        callback=print_output
    )

@task
def reporting_task(self) -> Task:
    return Task(
        # ...existing parameters...
        callback=print_output,
        human_input=True,
    )
Keep reading with a 7-day free trial
Subscribe to Lab For AI to keep reading this post and get 7 days of free access to the full post archives.