
How to Build a WebUI for an OpenAI's Swarm Application
Use Panel to create a chat interface that allows users to interact with the Swarm agents


Recently, OpenAI released a lightweight multi-agent framework called “Swarm”, which is defined as an experimental and educational project. The purpose of this framework is to allow developers to create chatbot applications that can interact with multiple agents in a more organized and scalable way. From its blog post and the initially released repository, Swarm introduces several key concepts, such as routines, which build the foundation of this framework that regulates the workflow of each agent with input messages, function calls, model inferences, and output messages; the handoff, which is the mechanism that allows agents to pass the speech position to another agent.

The best practice for using the Swarm framework is to build a scenario where human users can interact with a group of agents. Each agent can perform a specific task, and the system can always delegate the user request to the most suitable agent, such as a customer service chatbot or technical support chatbot. Therefore, building a web UI with sorted visualizations and intuitive interaction widgets for such scenarios becomes the most critical part of Swarm applications.

In this tutorial, I will build a simple customer support web app using the Swarm framework and panel library. You will learn how to develop a Swarm-based chatbot and equip it with a web UI in a few lines of code.
Panel UI framework

Panel is an open-source Python library that allows developers to create custom web apps for data visualization and interactive computing. Its advantage is that it provides high-level components (widgets, API) that facilitate the standard and common interactive app development by developers who are not professional web developers. Meanwhile, it also provides low-level API for professional developers to customize/extend the components or stylings to their needs.
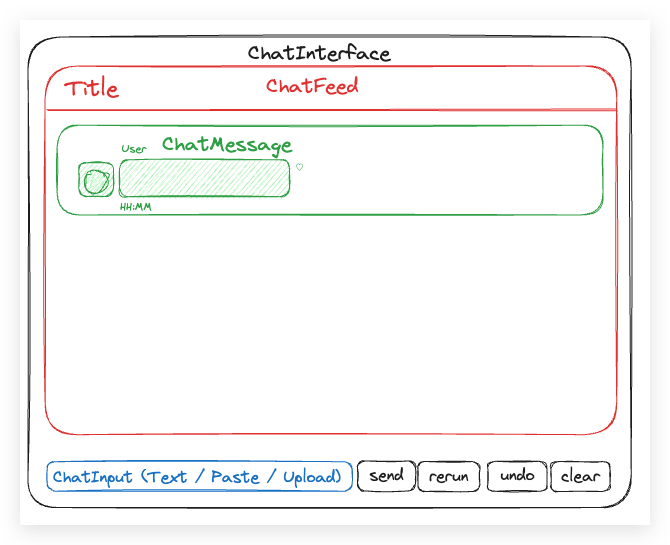
For example, go to its component gallery and find the Chat family components. You will see the top-level component called ChatInterface, which is a complete chatbox with an input area, a send button, and a message list in the main area. If you just want to create a standard chatbot like we will do in this tutorial, you can directly use this component with its default layout and styling. Also, you will see the bottom-level components like ChatInput and ChatMessage, which are the lower-level blocks that you can customize their internal logic or external appearance as you like.
Code walkthrough
Understanding the fundamental concepts of these tools, in this section, I will walk you through the code of a practical example that we will build in this tutorial.
Before starting, make sure you have installed the following packages, and note that you need to install the Swarm package from the source code:
pip install panel
pip install git+https://github.com/openai/swarm.git
Import the necessary modules that we will use in the code and set the OpenAI API key:
import panel as pn
from swarm import Swarm, Agent, Result
import random
import os
os.environ["OPENAI_API_KEY"] = "sk-your-key-here" # Replace with your key
In the main code, we will separate the code into 2 sections:
1. Initialize the Swarm client and define the agents
2. Define the Panel UI components and integrate them with the Swarm agents
Section 1 — Swarm
In the first section, we will create a Swarm “Studio” including one “Triage” agent and three work agents who will simulate the different customer support functions. The three agents are: a) Product Information Retrieval Agent, b) Order Status Retrieval Agent, c) Refund Processing Agent. Each agent will have its own set of functions and instructions that it can call, so let’s start with the definition of these functions.
1. Initialize the Swarm client for the “Studio”.
client = Swarm()2. Define the agents' functions. Here, we will define three simple functions for the three work agents to simulate the execution of product information retrieval, order status checking, and refund processing.
def get_product_info(product_id):
    # Simulated product database
    products = {
        "1": "Smartphone iPhone 16",
        "2": "Laptop MacBook Pro",
        "3": "Wireless Earbuds AirPods"
    }
    return products.get(product_id, "Product not found")

def get_order_status(order_id):
    # Simulated order statuses
    statuses = ["Processing", "Shipped", "Delivered", "Cancelled"]
    return random.choice(statuses)

def process_refund(order_id):
    # Simulated refund process
    success = random.choice([True, False])
    return "Refund processed successfully" if success else "Refund processing failed"
3. Define the instructions for the agents. Here, we will use the function definition to construct the instruction for each agent, embedding the context variables as placeholders that will be filled during the runtime.
The structure of context variables:
context_variables = {
    'customer_name': None,
    'last_order_id': None,
}
Instruction definitions, including the Triage agent and context_variables for context passing:
def triage_agent_instructions(context_variables):
    return f"""
    Triage agent for e-commerce support. Direct inquiries:
    - Product info: Product Information Agent
    - Order status: Order Status Agent
    - Returns/refunds: Returns and Refunds Agent
    Greet and clarify if needed.
    Customer: {context_variables.get('customer_name', 'Unknown')}
    """

def product_info_agent_instructions(context_variables):
    return f"""
    Product Information Agent. Provide product details using get_product_info.
    Be helpful, informative, suggest related products.
    Customer: {context_variables.get('customer_name', 'Unknown')}
    """

def order_status_agent_instructions(context_variables):
    return f"""
    Order Status Agent. Track orders with get_order_status.
    Explain statuses and delivery times.
    Customer: {context_variables.get('customer_name', 'Unknown')}
    Order ID: {context_variables.get('last_order_id', 'Unknown')}
    """

def returns_refunds_agent_instructions(context_variables):
    return f"""
    Returns and Refunds Agent. Process refunds with process_refund.
    Explain policy, guide through process.
    Customer: {context_variables.get('customer_name', 'Unknown')}
    Order ID: {context_variables.get('last_order_id', 'Unknown')}
    """
4. Define agent handoff functions. Besides the functions that perform the actual tasks, we must also define the handoff functions that explicitly transfer the speech position to a certain agent, carrying the context variables.
def transfer_to_product_info(context_variables):
    return Result(agent=product_info_agent, context_variables=context_variables)

def transfer_to_order_status(context_variables):
    return Result(agent=order_status_agent, context_variables=context_variables)

def transfer_to_returns_refunds(context_variables):
    return Result(agent=returns_refunds_agent, context_variables=context_variables)
5. Define the agents. Now, it’s time to consolidate all these routines and handoffs to define the four agents.
# Create agents
triage_agent = Agent(
    name="Triage Agent",
    instructions=triage_agent_instructions,
    functions=[transfer_to_product_info, transfer_to_order_status, transfer_to_returns_refunds]
)

product_info_agent = Agent(
    name="Product Information Agent",
    instructions=product_info_agent_instructions,
    functions=[get_product_info]
)

order_status_agent = Agent(
    name="Order Status Agent",
    instructions=order_status_agent_instructions,
    functions=[get_order_status]
)

returns_refunds_agent = Agent(
    name="Returns and Refunds Agent",
    instructions=returns_refunds_agent_instructions,
    functions=[process_refund]
)
For the basic implementation, each agent should have its own set of functions, including the “function” functions and “handoff” functions.
In the case of a normal Swarm application, now the “Studio” (client) can run by the proper agent appointed for speech delegation, using client.run() function. However, in this tutorial, we will focus on the UI part so that the client.run() function will be called later in the UI code.
Section 2 — Panel
So, let’s move on to the second section, which is the implementation of the Panel UI.
Keep reading with a 7-day free trial
Subscribe to Lab For AI to keep reading this post and get 7 days of free access to the full post archives.