
How to Add an Image Creator Agent to the Multi-agent Application
A Quick Tutorial of Building a Visualized AutoGen App with both GPT-4o and Dalle-3 Agents


If you’ve ever been amazed by what AI agents can do, you’ve probably wondered how they work. Building an AI agent, or even a group of them, will significantly benefit your LLM application, from breaking down a big job into smaller tasks and planning each step logically to using powerful AI expertise. These include retrieval augmented generation (RAG), code interpreter and execution, function calling, structured data output, and utilizing different tools and APIs. With today’s advanced frameworks like AutoGen and CrewAI, plus prompting strategies, groups of AI agents can be set up to tackle complex problems automatically and boost business and life efficiency like never before.
We now see AI image generators like Stable Diffusion and Midjourney creating amazing artwork. OpenAI’s Dalle-3, a huge upgrade from Dalle-2, integrates into ChatGPT and the OpenAI API package. This makes it one of the most exciting AI art models out there. Given Dalle-3’s capabilities, connecting our agents with this powerful model is crucial to see whether our AI application can solve artwork creation tasks.
Why need a Dalle-3 agent?
There are various practical uses of a Dalle-3 agent in your automated task workflow.
For example, when you need to create marketing copywriting, it normally requires agents like data researchers, copywriters, critics, and output wrappers to fit the final output text into a structured file like HTML or Word. The marketing material should also have some relevant illustrator to make it more attractive and professional, and that’s the responsibility of the Dalle-3 agent who follows the agents’ speeches to catch the text content, convert the key idea to prompt text and generate the images to the output package.
Here is the diagram of such a group chat workflow:
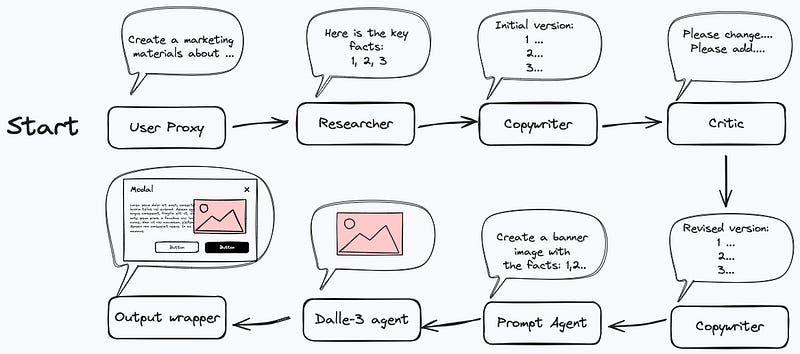
Additionally, the copywriter, prompt agent, and Dalle-3 agent can iterate the sub-task several times by user directions to ensure each paragraph can be supported by a relevant image. That’s the advanced usage of a custom image agent compared to the standalone ChatGPT playground.
The Design of this Demo
To focus on implementing the Image agent in the multi-agent application, I will show you a simple demo development in the AutoGen framework that includes a prompt agent and a Dalle-3 agent. The two agents play a key role in any artwork generation task, which works together to create and iterate the user's desired image.
Like always, I will select one easy-to-use UI framework to handle the visualization; in this demo, the Panel will be used.
Here are the screenshots:
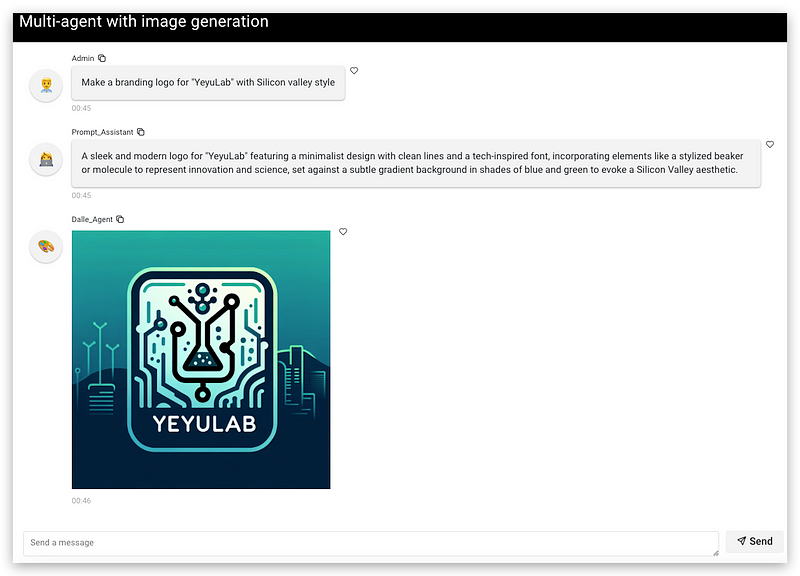
I asked for a logo for “YeyuLab” in Silicon Valley style.
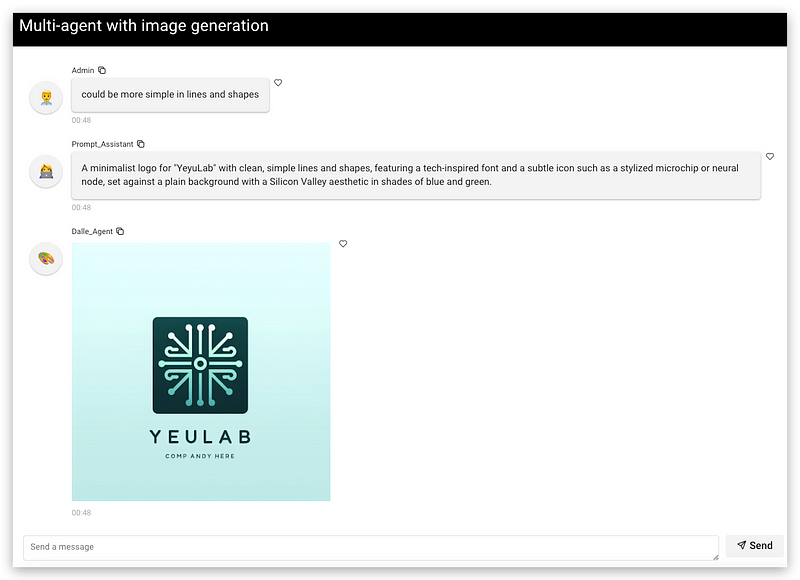
2. It looks like a chemistry lab, so I asked for an AI-related logo with further direction.

3. Looks much better, but I still feel it too busy in elements
Now, Despite the missing character (which is still normally happening), the logo looks nice, and I didn’t even make any refined prompt by myself.
The implementation is not complicated, so let’s quickly see the Python code.
Code Walkthrough
1. Install Dependencies
Make sure you have the necessary packages installed, including AutoGen, OpenAI, and Panel:
pip install --upgrade pyautogen==0.2.32 openai==1.36.1 panel==1.4.42. Include these libraries, classes, and functions
For AutoGen with OpenAI:
import autogen
from autogen import AssistantAgent, ConversableAgent, UserProxyAgent

import openai
from openai import OpenAI
For Panel:
import panel as pn
from panel.chat import ChatMessage
Miscellaneous:
import os
import time
import asyncio
3. Setup the Chat UI of Panel
Suppose you have learned how to develop apps with Panel’s innovative UI framework. In that case, you will be surprised by how easy it is to set up the Chat UI layout to wrap conversations between human users and LLM assistants.
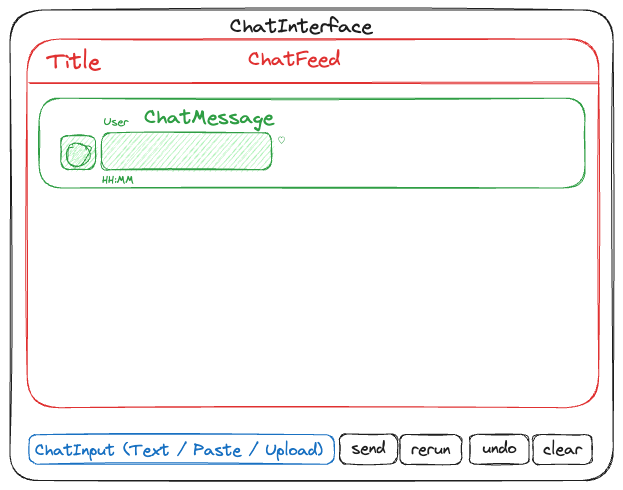
Such a couple of lines can be used to implement the layout above.
pn.extension(design="material")

chat_interface = pn.chat.ChatInterface(callback=callback)
chat_interface.send("Send a message!", user="System", respond=False)

pn.template.MaterialTemplate(
    title="Multi-agent with image generation",
    header_background="black",
    main=[chat_interface],
).servable()
The key enabler here is creating a chat_interface object that makes all the chat widgets accessible and controllable by application code. In this place, we have registered a callback to the interface, which will be triggered each time input content is added to the chat input widget in the chat_interface.
Let’s see the callback.
4. Callback Handler
To fit the architecture of AutoGen, there are two paths for the callback handler triggered by the user’s text input,
a) Start a group chat task
b) Further directions to the agents
initiate_chat_task_created = False
input_future = None

async def callback(contents: str, user: str, instance: pn.chat.ChatInterface):

    global initiate_chat_task_created
    global input_future

    if not initiate_chat_task_created:
        asyncio.create_task(delayed_initiate_chat(user_proxy, manager, contents))

    else:
        if input_future and not input_future.done():
            input_future.set_result(contents)
        else:
            print("There is currently no input being awaited.")
The global variable initiate_chat_task_created = false will create an asyncio task to run the core process of AutoGen in delayed_initiate_chat() function by providing agents and contents. The input_future variable is used to store and signal the subsequent input.
Here is the simple delayed_initiate_chat()function:
async def delayed_initiate_chat(agent, recipient, message):

    global initiate_chat_task_created
    # Indicate that the task has been created
    initiate_chat_task_created = True

    # Wait for 2 seconds
    await asyncio.sleep(2)

    # Now initiate the chat
    await agent.a_initiate_chat(recipient, message=message)
It just simply calls the AutoGen method a_initiate_chat() after a short wait.
