
Building Modular and Streaming Gemini Applications with GenAI Processors
A Quick Tutorial for using GenAI Processors Library from Gemini

When you want to build AI agents, you generally have two main approaches. The first is deep coding. This means writing all the code yourself, often directly using Python's asynchronous features to manage background operations. The good side is that you get complete control and can customize every small detail. The bad side is that it becomes very complex very quickly. You have to manually handle things like managing concurrent tasks, keeping track of data states, and dealing with errors. This can make your code hard to manage as the agent grows.
The second approach is using no-code or low-code platforms. These are fast to set up and great for simple tasks. You can often drag and drop components to create a basic agent. However, they usually come with limitations. When your agent needs custom logic, or if you want to connect to a specific API that the platform does not support, you quickly run into problems.
GenAI Processors
GenAI Processors offers a different way to build these agents. This new open-source Python library from Google DeepMind brings structure and simplicity to building advanced AI applications. It provides a consistent way to define how data is handled, from taking input and doing early processing to making model calls and managing output. It gives you a structured coding experience, but with the full control of Python.
At its core, GenAI Processors treats all input and output as asynchronous streams of ProcessorParts. Think of ProcessorParts as standard data chunks. This could be a piece of audio, a line of text, or an image. Each part travels through your pipeline with its own descriptive information like its type. This stream-based design makes it simple to connect different operations, from basic data changes to complex model calls.

The library is designed to make tasks run efficiently. For example, a data piece generated in one part of the flow can start processing even while earlier parts of the flow are still working. The system makes sure output order is correct relative to the input, and it aims to give you the first piece of output quickly. This efficient operation happens without you having to manage complex details.
For example, you can build a "Live Agent" that handles real-time audio and video using the Gemini Live API with just a few lines of code.
      # This code from the official blog post shows the core concept.
from genai_processors.core import audio_io, live_model, video

# Input processor: combines camera and microphone streams.
input_processor = video.VideoIn() + audio_io.PyAudioIn(...)
# Output processor: plays audio from the model.
play_output = audio_io.PyAudioOut(...)
# The main model processor.
live_processor = live_model.LiveProcessor(...)

# The agent is composed by chaining processors with the '+' operator.
live_agent = input_processor + live_processor + play_output

# The agent runs in a simple async loop.
async for part in live_agent(streams.endless_stream()):
  print(part)
This code shows how input sources and processing steps combine using the + operator. This creates a clear flow of data. The system handles the flow from your camera and microphone, through the Gemini Live API, and then to audio output, all working in the background.
The Core Components
The library is built on a few simple ideas:
ProcessorPart: This is the basic unit of data. It's a container for content, such as text, an image, or audio. It holds the data itself and descriptive information like its type.
Processor: This is a processing station. It takes a stream of ProcessorParts as input and produces a stream of ProcessorParts as output. An example is a processor that collects all incoming text before summarizing it.
PartProcessor: This is a specialized processor. It acts on one ProcessorPart at a time, independently. The library can run these concurrently on many parts, which is very efficient. A processor that translates each sentence separately is an example of a PartProcessor.
With these building blocks, you can create pipelines by chaining processors together using simple operators: + for sequential processing, and // for parallel processing.
Let's look at two practical examples to see how this works.
Demo 1: Interactive Blog Post Generator with Images
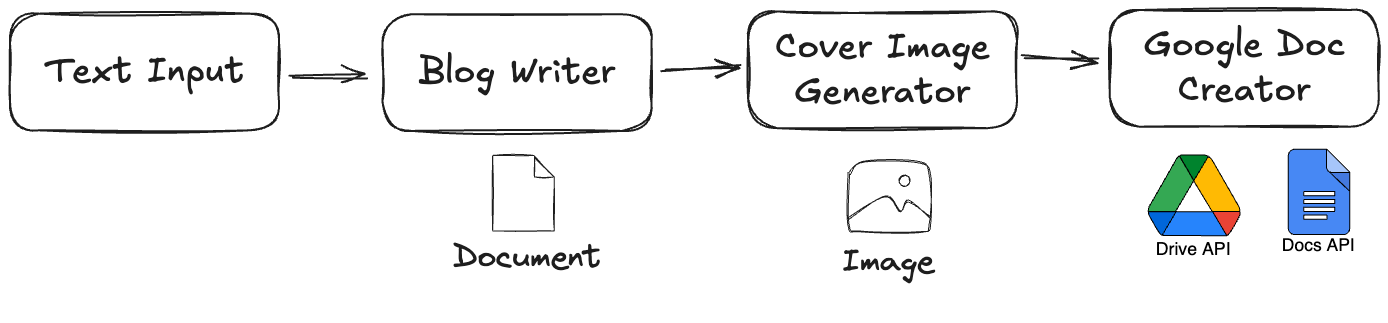
Our first demonstration is an Interactive Blog Post Generator with Images. This project creates a simple tool where you type in a topic, and the system automatically writes a blog post about it, generates an eye-catching header image, and saves both the text and the image into a new Google Doc in your Drive. This shows how to take simple text input and produce structured, multi-modal output to an external platform.
Here is the demo video:
Workflow
The data flows through a simple, sequential pipeline:
User Input -> Blog Writer -> Image Generator -> Google Doc Creator
Code Walkthrough
We assemble the pipeline by defining each step as a processor and then chaining them.
1. Getting User Input: The @processor.source() Decorator
The pipeline needs a starting point. We use the @processor.source() decorator. This turns a simple asynchronous generator function into a full Processor that provides data from the user.
@processor.source()
async def TerminalInput(prompt: str):
    """A source processor that yields text from the user's terminal input."""
    while True:
        # `asyncio.to_thread` runs the blocking `input()` call in a separate
        # thread so it doesn't freeze the application.
        input_text = await asyncio.to_thread(input, prompt)
        if input_text.lower() == 'q':
            break
        if input_text:
            # `yield` sends the user's text into the pipeline as a ProcessorPart.
            yield input_text
This processor produces a stream of data from an external source, the user, rather than changing an existing stream.
2. Generating the Image: A Custom Processor
This custom processor is defined as a class that inherits from processor.Processor. It needs to do two things: generate an image based on the incoming text and pass both the original text and the new image to the next step in the pipeline.
class ImageGeneratorProcessor(processor.Processor):
    async def call(self, content):
        buffer = ""
        # First, we loop through the incoming stream to get all the text.
        async for part in content:
            if part.text:
                buffer += part.text
            # It's important to yield the original part so the next processor
            # in the chain (the Doc creator) can access the blog text.
            yield part

        # After collecting the text, we generate the image.
        if buffer:
            title = buffer.split('\n', 1)[0].strip("# ")
            image_prompt = f"Create a header image for a blog post about: {title}"

            # ... (API call to an image generation model) ...

            # Finally, we yield a new ProcessorPart containing the image data.
            # This part is added to the stream for the next processor.
            yield processor.ProcessorPart(image_bytes, mimetype="image/png")
A Processor has full control over the stream. It can collect parts, hold information, and create new parts. It must pass on any data needed by later processors.
3. Saving to Google Docs: A Custom PartProcessor with OAuth
This custom processor handles the Google Docs API calls. It takes both the blog text and the generated image to create a rich document. It handles authentication securely using OAuth, which might open a browser for your first-time consent.
Generated python
      class OAuthDocWithImageProcessor(processor.PartProcessor):
    # ... __init__ and OAuth setup ...
    async def call(self, part: content_api.ProcessorPart):
        # ... logic to collect text and image ...
        if self.blog_content and self.header_image_bytes:
            # ... (Google Docs API calls to create doc and insert content/image) ...
            yield processor.status(f"Created doc: {doc_url}")
This processor performs a real-world action, creating an output file in your Google Drive.
4. Assembling the Pipeline
The final step is to connect all the processors. The + operator creates a linear chain where the output of one processor becomes the input for the next.
# --- 1. Define the Processor Instances ---
blog_writer = genai_model.GenaiModel(...)
image_generator = ImageGeneratorProcessor(...)
doc_creator = OAuthDocWithImageProcessor()

# --- 2. Assemble the Pipeline ---
pipeline = blog_writer + image_generator + doc_creator.to_processor()

# --- 3. Define the Input Source ---
terminal_source = TerminalInput("Enter a blog post topic > ")

# --- 4. Run the Interactive Pipeline ---
async for part in pipeline(terminal_source):
    if part.substream_name == "status":
        logging.info(f"[PIPELINE STATUS] {part.text}")
This example shows a clear, linear workflow combining pre-built components, custom logic, and external API calls.
(The full code for this demo is available on my GitHub Repository.)
Demo 2: GitHub Repo Podcast Generator
Our second demonstration is the GitHub Repo Podcast Generator. This project is more advanced and multi-modal. It takes a GitHub repository URL, fetches its data, writes a short podcast script about it, generates a cover image, and synthesizes the script into a multi-speaker audio file. This showcases handling diverse inputs and outputs and achieving concurrency within a sequential pipeline.
Here is the demo video:
Workflow
This pipeline is a sequential chain of processors. The output of one step becomes the input for the next. However, we'll see how asyncio allows for efficient operation even within this structure.
Input -> GitHub Fetcher -> Script Writer -> Header Image Gen -> Audio Gen -> Save All Assets

Code Walkthrough
This pipeline highlights how to use pre-built components and achieve efficiency in a step-by-step process.
1. Fetching from GitHub and Writing the Script
We start with two pre-built processors chained together. The github.GithubProcessor handles API calls to get the repo's README. The genai_model.GenaiModel then takes that text and generates the podcast script.
# This processor handles fetching the README and metadata.
gh_proc = github.GithubProcessor(api_key=GITHUB_TOKEN)

# This processor takes the repo info and writes the script.
podcast_writer = genai_model.GenaiModel(
    model_name="gemini-2.5-flash",
    # ... (system instruction for writing a podcast script) ...
)
2. Generating the Image and Audio Sequentially but Efficiently
Next in the chain are two custom Processors. The HeaderImage processor takes the script, generates an image, and then passes both the original script and the new image down the stream. After that, the GeminiTTSProcessor receives those parts, uses the script to generate audio, and then passes the script, the image, and the new audio to the final step.
class HeaderImage(processor.Processor):
    async def call(self, content):
        # ... logic to get text and generate image ...
        # It passes the original content through, then adds its own output.
        yield original_script_part
        yield new_image_part

class GeminiTTSProcessor(processor.Processor):
    async def call(self, content):
        # It finds the script part in the stream to generate audio.
        # ... logic to find script and generate audio from it ...
        # It passes all received parts through, then adds its own output.
        yield original_script_part
        yield received_image_part
        yield new_audio_part
The key here is how these processors handle waiting for API calls. They use asyncio.to_thread, which runs the blocking network request in the background. This allows the Python event loop to work on other tasks, making the application responsive and efficient even without a parallel pipeline structure.
3. Assembling the Sequential Pipeline
The final pipeline is a clear, sequential chain of processors connected by the + operator.
def build_pipeline(api_key: str):
    # ... processor definitions ...
    return (
        gh_proc
        + podcast_writer
        + TextBuffer() # Collects the script into one part
        + header_image_proc # Runs after script is ready
        + tts_proc # Runs after image is ready
        + SaveAssets() # Runs last to save all files
    )
This pipeline demonstrates how to build a complex, multi-modal application with a clear, step-by-step logic. The internal use of asyncio within each processor ensures that the application doesn't freeze while waiting for network responses, leading to efficient execution.
(The full code for this demo is available on my GitHub Repository.)
Useful Links:
GenAI Processors - https://github.com/google-gemini/genai-processors
Demo Source Code - https://github.com/yeyu2/Youtube_demos/tree/main/Genai-processors