
Building a Real-Time Multimodal App Locally Deployed with Phi-4 and Kokoro
A Quick Tutorial on Using Open Source Models to Build Multimodal Realtime Application

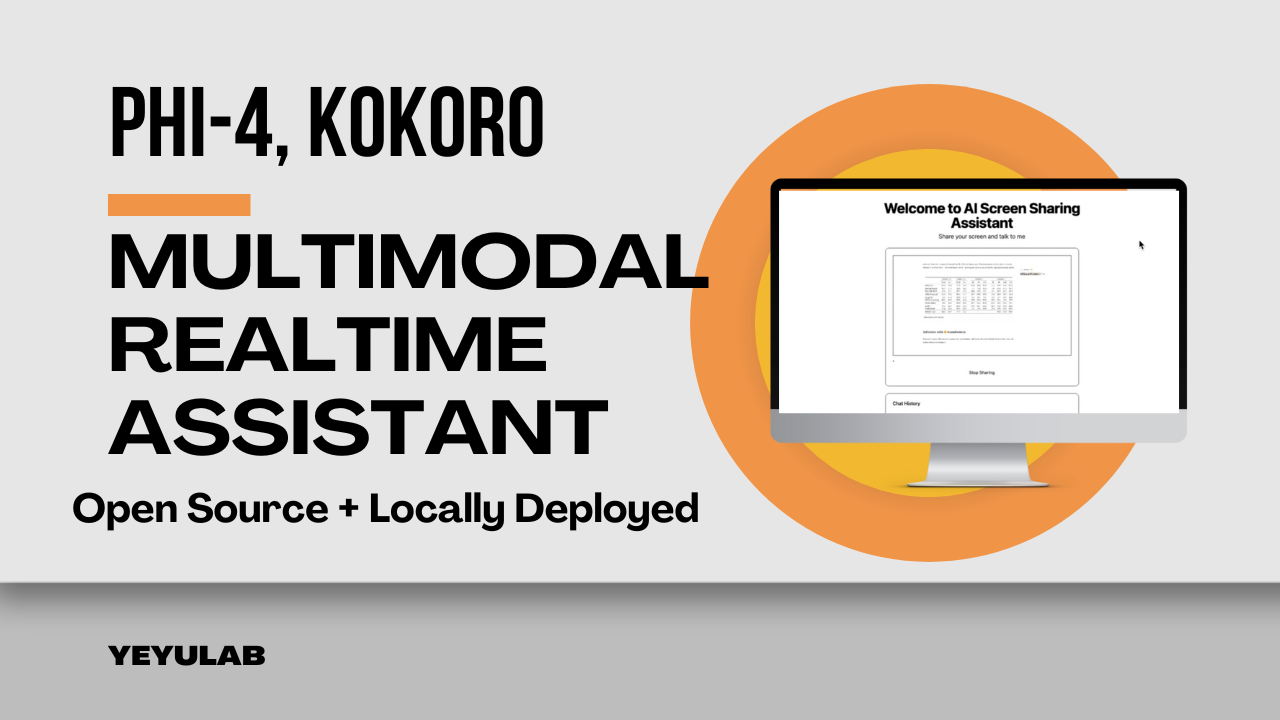
Want to build real-time AI apps that see, hear, and talk back, like screen sharing assistants? That's a multimodal real-time assistant, and we've been building these kinds of applications for a while. You can approach this in a couple of ways: using cloud services like the Gemini Live API, which are convenient for development but come with limitations from its preview status, like 2-minute session limits, or by going the open-source route. The open-source path often involves combining several models for different process stages, like OpenAI’s Whisper for hearing, Gemma or Qwen for understanding images and text, and Kokoro for talking. This gives you amazing control and privacy, but it does mean managing several different models working together.
Today, we're looking at a fascinating new player in the open-source space: Microsoft's Phi-4-multimodal. What makes Phi-4 particularly interesting is that its design is a single, unified architecture capable of simultaneously processing speech, vision, and text. This means it can potentially replace the separate ASR (Whisper) and multimodal VLM (Gemma or Qwen) components in our pipeline, simplifying the architecture and potentially improving efficiency.
Phi-4-multimodal is a 5.6B parameter model that boasts impressive performance, particularly in automatic speech recognition (ASR) and speech translation (ST), even outperforming specialized models like WhisperV3 on some benchmarks. While its factual QA capabilities might lag behind much larger models, its unified multimodal processing and efficiency make it a compelling choice for real-time interaction scenarios.


In this article, we'll explore how to use Phi-4-multimodal and Kokoro TTS to build a real-time multimodal backend. We'll cover the basics of interacting with Phi-4, the design of our backend server, and how we implement features like streaming output and interrupt handling.
A Quick Start for Phi-4
Before integrating Phi-4 into a full real-time server, let's use a simple script like test.py to get a feel for how to load and interact with the model locally. This will help us understand the core API and prompt formatting.
GPU requirement
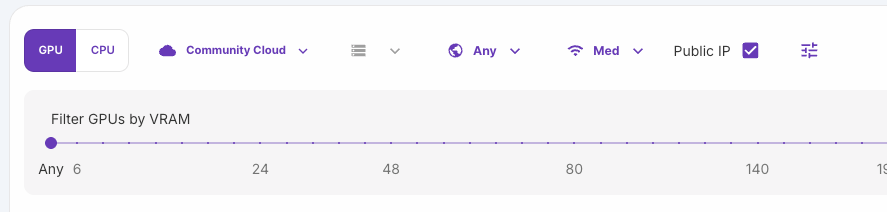
To run the model in the local environment, you should have an Nvidia GPU or an equivalent one with at least 12 GB of VRAM and Pytorch 2.1+ installed. If you don’t have such computing resources yet, you can choose the online GPU cloud for a quick or production deployment at an hourly cost. I am currently using the service from Runpod, which has a huge number of GPU selections based on your need for memory sizes, processing speed, regions, or cost.
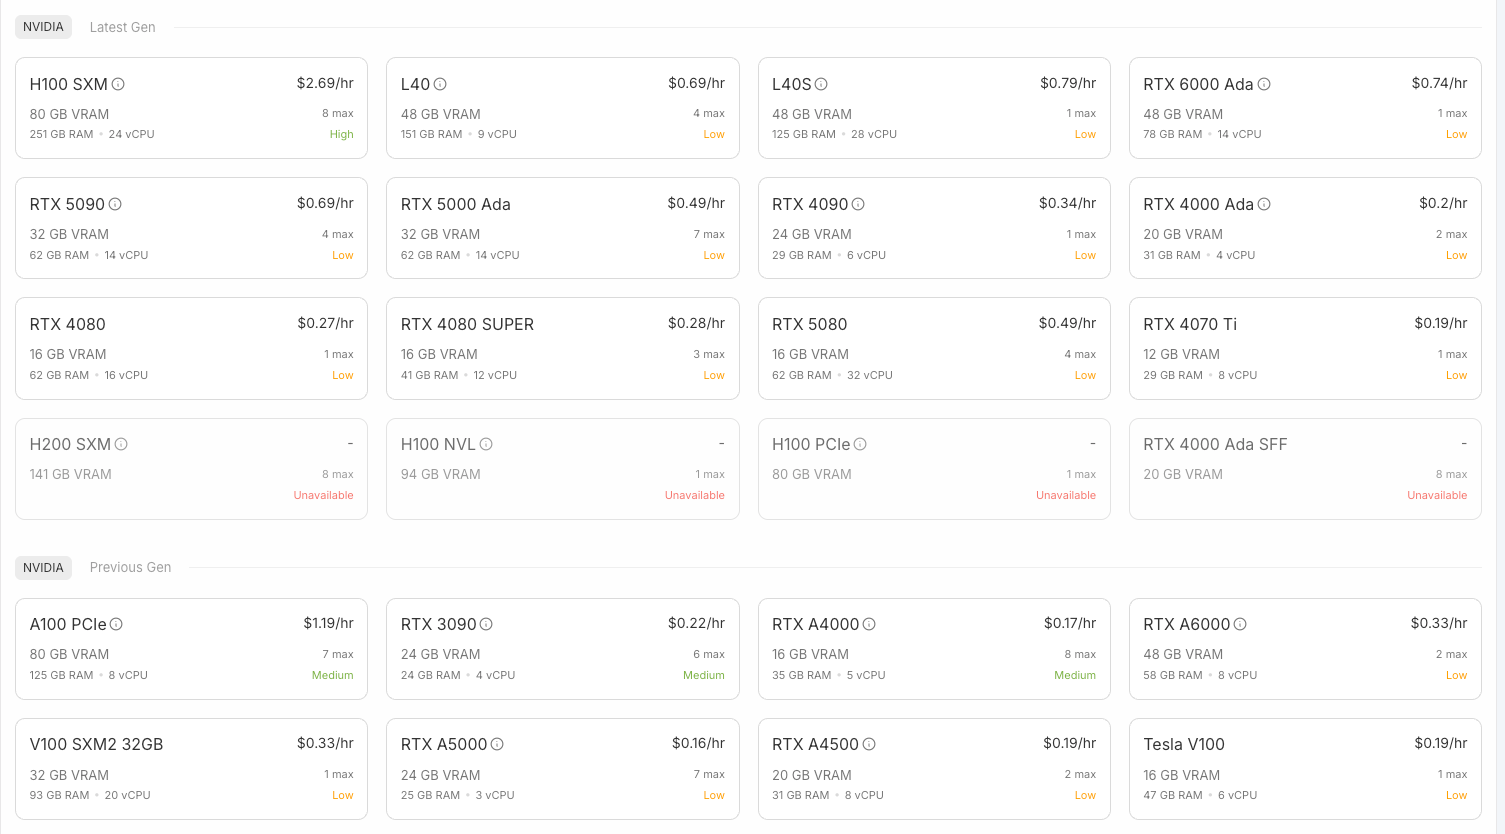
For inference of this multimodal real-time application, we can choose from the Community Cloud (lower cost) by selecting the RTX4000 Ada for only $0.2/hr or an older version RTX A4000 for only $0.17/hr pay-as-you-go cost. They are quite enough to run the code in this tutorial.
You can follow their instruction to start a server, connect, transfer code files, and run.
Code for Test
Phi-4 family has been integrated into the 4.48.2 version of transformers. It’s recommended to pip install the following packages to make sure the test code runs correctly:
flash_attn==2.7.4.post1
torch==2.6.0
transformers==4.48.2
accelerate==1.3.0
soundfile==0.13.1
pillow==11.1.0
scipy==1.15.2
torchvision==0.21.0
backoff==2.2.1
peft==0.13.2
The first step is loading the necessary components: the processor, the model, and the generation configuration. Since Phi-4 is a relatively new model, we'll often need to load it with trust_remote_code=True from Hugging Face.
from transformers import AutoModelForCausalLM, AutoProcessor, GenerationConfig
import torch
# ... other imports ...

model_path = 'microsoft/phi-4-multimodal-instruct'

# Load the processor
processor = AutoProcessor.from_pretrained(model_path, trust_remote_code=True)

# Load the model
model = AutoModelForCausalLM.from_pretrained(
    model_path,
    trust_remote_code=True,
    torch_dtype='auto', # Use 'auto' or torch.bfloat16 for efficiency
    _attn_implementation='flash_attention_2', # Requires Flash Attention installed for speed
).cuda() # Move model to GPU

# Load the generation config
generation_config = GenerationConfig.from_pretrained(model_path)

# ... rest of test.py ...
Here, we load the AutoProcessor and AutoModelForCausalLM for Phi-4. We specify torch_dtype='auto' to let Hugging Face select the most efficient data type for our hardware, and _attn_implementation='flash_attention_2' to leverage Flash Attention for faster inference if available. We also load the GenerationConfig which contains default parameters for generating text.
A key aspect of working with Phi-4-multimodal is its specific prompt format, which uses special tokens to delineate system instructions, user input (including modalities like audio and image), and the assistant's response.
# ... prompt component definitions ...

# Example Multimodal Prompt Structure
system_instruction = "You are a helpful multimodal assistant."
custom_prompt = "Answer the question in the audio based on the image."

prompt = f'{system_tag}{system_instruction}{system_end_tag}'
prompt += f'{user_tag}<|audio_1|>{custom_prompt}<|image_1|>{user_end_tag}'
prompt += f'{assistant_tag}' # The model will generate text after this tag
This structure is crucial: the system instruction comes first, followed by the user's turn, which includes the audio (<|audio_1|>) and image (<|image_1|>) tokens alongside the text query, and finally the assistant tag to signal where generation should begin.
To get real-time output, we use Hugging Face's TextIteratorStreamer and run the generation in a separate thread.
Keep reading with a 7-day free trial
Subscribe to Lab For AI to keep reading this post and get 7 days of free access to the full post archives.